Cost Recovery Nexteer Users

ACCESSING COST RECOVERIES
Within the Cost Recovery System Application you will notice a Cost Recovery List tab which lists all Cost Recovery case records that have been assigned to your location. This will allow you to view any Cost Recovery even though you may not have an outstanding action. From this tab you can see a summary of all Cost Recovery cases, search, open and view the form. Follow the steps below to locate a Cost Recovery case in the system.
- Start by selecting the Cost Recovery Application from your Applications Dropdown.
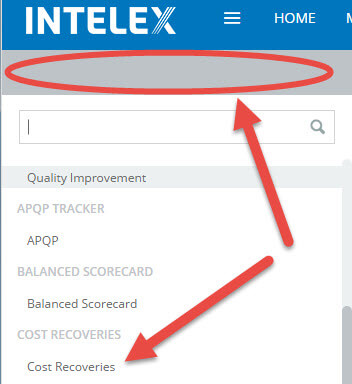
- Once the application loads select the Cost Recovery List tab. This will display an inventory page listing all existing Cost Recovery records.

- From this page you will be able to search and sort by any column on the view.
- To Search, type a key word into any of the column fields directly below the header column name. Then press enter to apply the filter.
- To Sort, select the header name. This will display an arrow to the right of the heard name. Select that arrow to indicate if you would like to sort ascending or descending.
- Once you have located the Cost Recovery case that you would like to view, simply click on the record number to view more details.
WORKFLOW DIAGRAM:

TASK SUMMARY
| Stage | Due Date | Person Responsible | Task |
| Draft | Nexteer Employee (originator) | Submit | |
| Document Review | GSM Commercial Manager, GSM Regional Contact, or Quality Manager | Review the cost recovery Accept to send to supplier or reject for rework. | |
| Supplier Response | Supplier Owner | Accept or Dispute the CR | |
| Cost Recovery Escalation Review | GSM Commercial Manager, GSM Regional Contact, or Quality Manager | Accept, reject, or cancel the recovery | |
| Finance Review | Finance | Complete / Close |
SUBMIT COST RECOVERY
Demonstration Videos:
Create Cost Recovery – English (5:12) (Nexteer Network Required)
Create Cost Recovery – Chinese Subtitles (5:12) (Nexteer Network Required)
Create Cost Recovery – Portuguese Subtitles (5:12) (Nexteer Network Required)
As a Nexteer employee, it is your responsibility to track and submit any Cost Recoveries you incur in your plant related to problem cases. In order to submit a Cost Recovery in the Intelex system, start by logging into Intelex and using the Applications dropdown to navigate to the Cost Recovery Application. Once this application page loads, follow the steps below to successfully submit a new Cost Recovery record:
- Start by selecting the supplier location from the Location dropdown in the top right hand corner. This is the location your Cost Recovery will be sent to once you submit. Note the DUNS number next to the supplier name.

- Then select the Submit new Cost Recovery tab on the left. This will bring you to a new blank Cost Recovery form for you to start entering the details.

- Complete the Cost Recovery Detail fields and sub-sections. Any field that has an asterisk is a mandatory field and must be filled in before you will be able to save the form. You will notice some fields have already been auto populated and some will populate once you save the record.
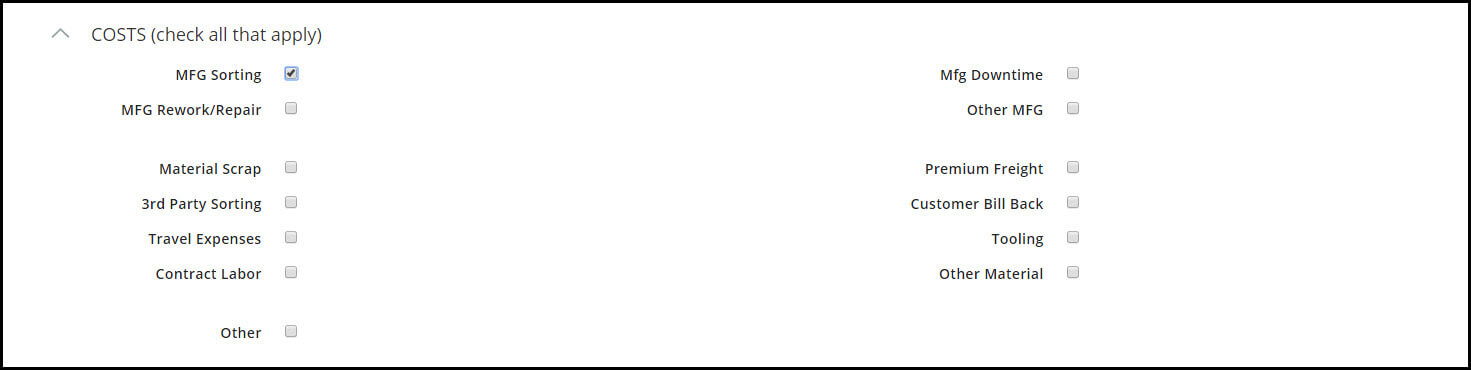
- Complete the Costs sub-section. Check all related cost items. This will show the fields required to be populated for this cost item(s).

- Complete the Manufacturing Costs and Material Costs sub-sections as required. The total costs will populate on save.
- Complete the Costs sub-section. Check all related cost items. This will show the fields required to be populated for this cost item(s).
- Now that you have captured the entire Cost Recovery details section including sub-sections, you can save the record to complete the remaining steps. To do this click Save from the menu bar.
- You will now notice the Workflow Status section displaying the Cost Recovery record currently in the draft stage and that you are responsible for submitting the record to the next stage. Now that you have started the workflow for this record, you will also see this record as a line item on your My Tasks Summary page until you submit the Cost Recovery.

- Before submitting the Cost Recovery to the next stage, you are able to attach any related Problem Cases and document attachments to your Cost Recovery record.
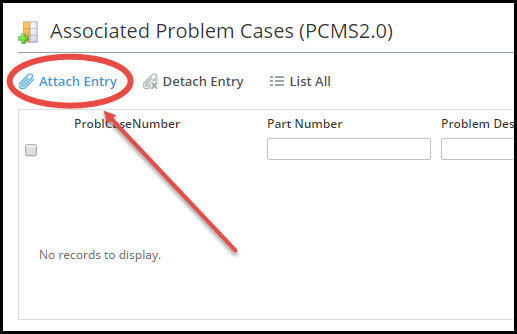
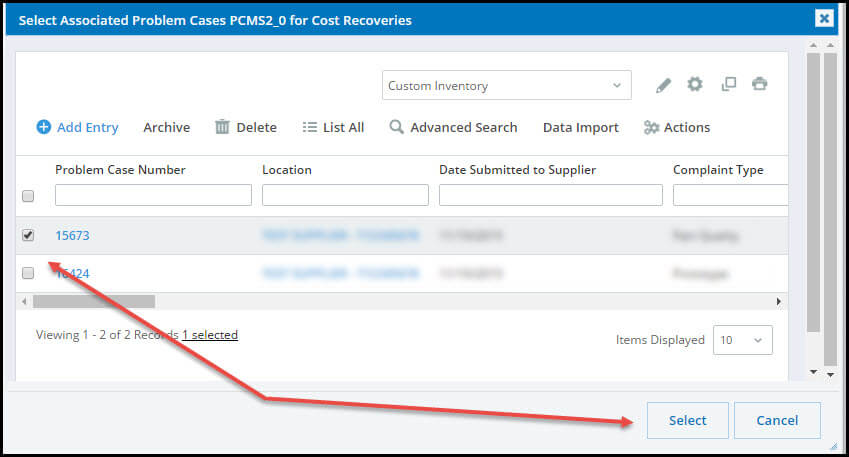
- To link related Problem Cases scroll down to the Associated Problem Cases section and select Attach Entry.

- Once clicked a list of Problem Cases will display. Select the related case(s) and click Select when done. This will relate the Problem Case(s) to the Cost Recovery.

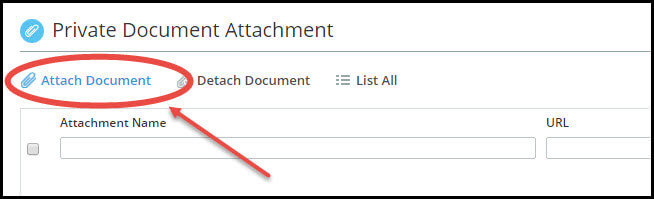
- To attach documents to your Cost Recovery record scroll down to the Private Document Attachment section and click Attach Document. Note: Private documents are seen by everyone. Private means the document is only associated to this one Cost Recovery.

- Select the Browse button. Locate the file you would like to upload from your hard drive and select Upload File. This file will now be attached to this Cost Recovery record and anyone viewing this record will be able to access the document. You can upload as many files as necessary.
- To link related Problem Cases scroll down to the Associated Problem Cases section and select Attach Entry.
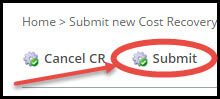
- Once you have completed linking Problem Cases and Attaching documents you can now submit the record to the next stage.

- Submit: The submit action will send the case to the CR Document Reviewer previously selected in step 3 (Cost Recovery Details). An email will be sent to the supplier stating that they have a potential cost recovery to work. The CR Document Reviewer will either approve the case and send it to the supplier or return it for rework.
- Cancel CR: The Cancel CR action will close the record and ends the work flow.
- Once you have completed this task using one of the 2 options the draft task is complete and the task will be removed from your My Tasks list.


DOCUMENT REVIEW STAGE
Demonstration Video:
Cost Recovery Review – English (2:16) (Nexteer Network Required)
A Word from the GSM Controller – English (4:40) (Nexteer Network Required)
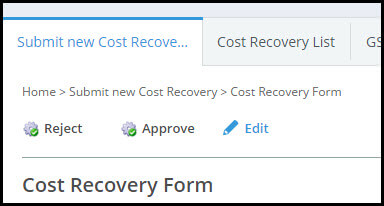
During the Document Review Stage the Nexteer CR Document reviewer will be responsible for either approving and sending the Cost Recovery record to the supplier or rejecting the Cost Recovery record back to the originator for rework. Note: Once the Cost Recovery is approved, any external supplier cost recoveries (which are non-warranty) will notify Finance to debit GSM.
- To review a Cost Recovery record, open the record from the email link or from your My Tasks screen.
- Click edit from the menu bar and scroll down to the Document Review Details section. Enter your Review comments and click Save in the menu bar.
- If Approving the record Click Approve in the menu bar. This will send the record to the supplier by moving the work flow forward into the
Supplier Response stage. - If Rejecting the record Click Reject from the menu bar. This will send the Cost Recovery record to the originator.

- If Approving the record Click Approve in the menu bar. This will send the record to the supplier by moving the work flow forward into the
- Once you have completed this task using one of the 2 options your task is complete and the task will be removed from your My Tasks list.
Supplier Response Stage
During the supplier response stage the supplier will be notified that a new Cost Recovery record has been sent to them and they are assigned a task to respond. At this stage the supplier can choose to Accept or Dispute the Cost Recovery. If the Cost Recovery is Accepted the work flow will progress to the Finance Review stage. If the Cost Recovery is Disputed a task will be assigned to the Document Reviewer (in Escalation Review stage) for review.
SUPPLIER RESPONSE STAGE
During the supplier response stage the supplier will be notified that a new Cost Recovery record has been sent to them and they are assigned a task to respond. At this stage the supplier can choose to Accept or Dispute the Cost Recovery. If the Cost Recovery is Accepted the work flow will progress to the Finance Review stage. If the Cost Recovery is Disputed a task will be assigned to the Document Reviewer (in Escalation Review stage) for review. Please see the Supplier User Guide for more details on this step.
ESCALATION REVIEW STAGE
Demonstration Video:
Cost Recovery Escalation Review – English (1:44) (Nexteer Network Required)
It is the responsibility of the Escalation Reviewer to review the Cost Recovery and make a decision based on the 4 options available. For Nexteer to Nexteer cases the Escalation Reviewer should be the Customer Plant Financial Analyst for all supplier Cost Recoveries the Escalation Review should be the GSM Coordinator.
- To review the Cost Recovery Record, open the record from the email link or from your My Tasks screen.

- Reject and Close: This option will reject the escalation and close the case.
- Authorize Recovery from Supplier: This will submit the case to Finance for review and to debit the supplier.
- Absorb Costs (Does not apply to Nexteer to Nexteer): This is if GSM accepts the costs incurred by the plant but the supplier doesn’t agree to pay. The costs will then be taken from GSM.
- Cancel CR (Admin functionality only): This will cancel the CR.
- Scroll down to GSM Approver details and enter in the Supplier negotiated amount and the GSM Absorbed Amount if GSM is absorbing the costs. If there are no supplier negotiated or GSM absorbed amount then enter 0 in for that amount. The Customer Plant Financial Analyst should work with the Supplier Plant Financial Analyst to determine/negotiate cost recovery and required support documentation

FINANCE REVIEW STAGE
Demonstration Videos:
Finance Review – English (1:51) (Nexteer Network Required)
Finance Review – Chinese Subtitles (1:51) (Nexteer Network Required)
Finance Review – Portuguese Subtitles (1:51) (Nexteer Network Required)
Once the supplier has accepted the Cost Recovery an email notification and task is assigned to the Finance Owner previously selected in the draft stage. As a finance owner you are responsible for completing the Cost Recovery. This is Finances approval to process the debit/credit adjustment for the amounts given to the supplier/Nexteer Plant. Note: depending on the workflow costs may be provided in different areas of the Cost Recovery.
- To review the Cost Recovery record, open the record from the email link or from your My Tasks screen.
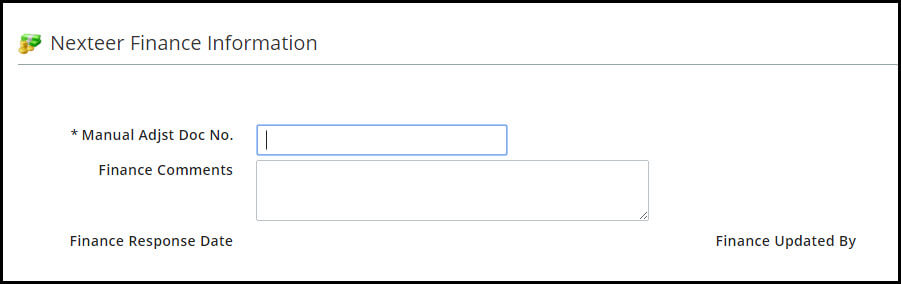
- Click Edit in the menu bar and scroll down to the Nexteer Finance Information section (this should automatically be brought to focus).

- Click Edit in the menu bar and scroll down to the Nexteer Finance Information section (this should automatically be brought to focus).
- Complete the required fields marked with an asterisk.
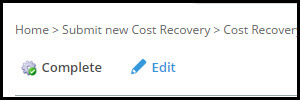
- Once complete click Save in the menu bar, then click Complete in the menu bar to complete the task and remove it from your My Tasks list.

- Once complete click Save in the menu bar, then click Complete in the menu bar to complete the task and remove it from your My Tasks list.
- At this point the workflow is complete and the Cost Recovery case is closed.