APQP Nexteer User Guide

APQP Overview
APQP or Advanced Product Quality Planning is Nexteer’s application to track the progress of the APQP activities during a new program launch.
Accessing APQP
To access the APQP application follow the below steps.
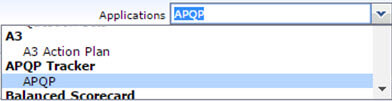
- Start by selecting the APQP Application from your Applications Dropdown menu.
Workflow Diagram:

PMD Record Creation and APQP Disposition
A PMD record will be created from the existing PMD database within the Intelex system using a Data Import process (weekly). A notification will be sent to AQE listed on PMD record. 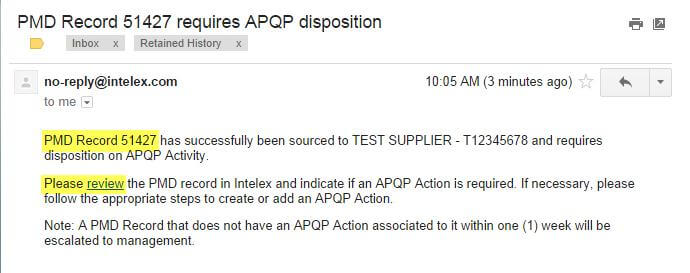
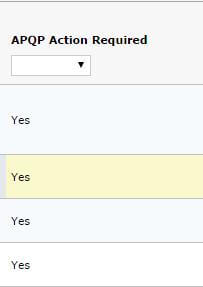
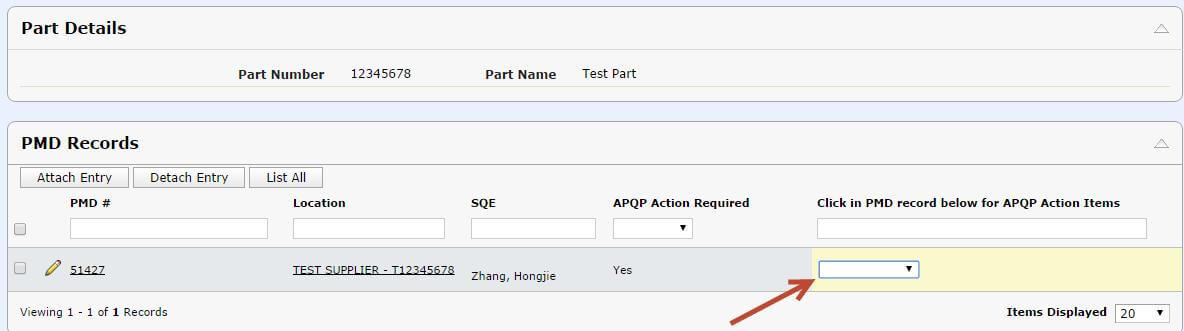
The notification will include a link to the Part Details screen within Intelex. This screen will show all PMD records associated to the Part Number, including the PMD record mentioned in the email notification that is awaiting an APQP Action Disposition:
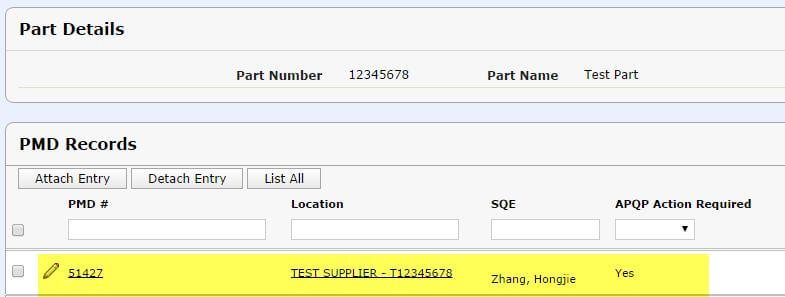
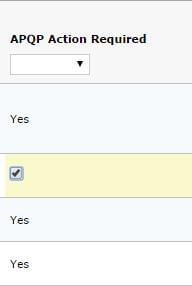
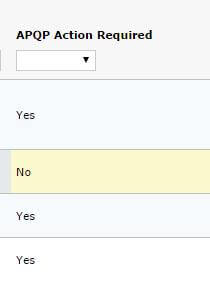
If an APQP Action is not required, the APQP Action Required field should be changed to “No” by unchecking the box in the row associated to that PMD record. Click on the APQP Action Required field next to the word “Yes” and the checkbox will appear. Remove the checkmark and click off of the field, and the response will change to “No”. Your task is now done. Note: if an APQP Action is required, continue to the next section without changing this response.
![]()
![]()
APQP Action Association
If an APQP Action is required for this PMD record, an existing APQP Record can be associated to the PMD record. To associate a related APQP Action to a PMD Record:
- In PMD Records section of Part Details, mouse over Click in PMD record below for
APQP Action Items field (field will highlight yellow) - Click to open a drop down box.

- In drop down box, select the APQP Action record to associate to the PMD record.
- Click off the field. The APQP Action is now associated to the PMD record.
No further action is required.
APQP Action Creation
If an APQP Action is required and no existing APQP Action is available to associate to this PMD record, then a new APQP Record should be created. To create a new APQP Action, scroll to APQP Actions grid within the Part Details and click on Add Entry. This will open the APQP Actions Information form.
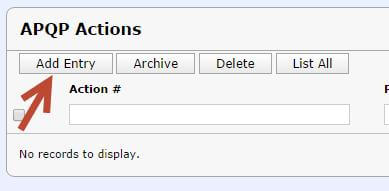
- Once in this screen, there are no fields that are required in order to create the record. Therefore you are able to click on Save to create the record.
- Click Edit.
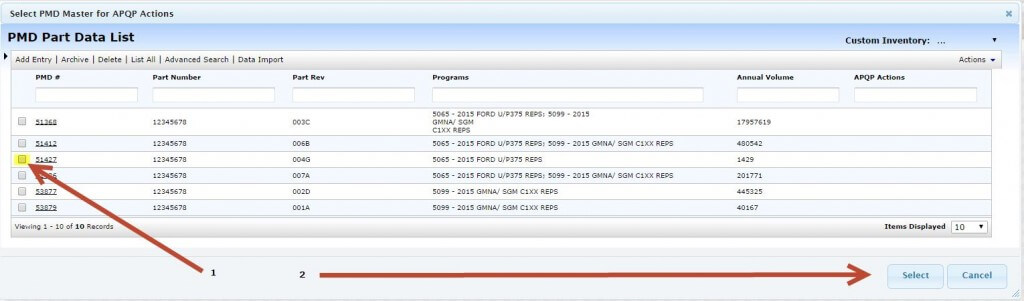
- Select your PMD Master Record (this will be the PMD record that will be considered the Master record for pulling dates and other pertinent information into your APQP Action):
- Click Select.

- From the popup window, select the PMD record you wish to have as your
PMD Master.
- Only PMD records that are associated to that Part Number will be shown in the
Select list. Find the PMD record you are working with and select the checkbox
next to it, then click on Select.
- Click Select.
- Select the box next to AQE Nomination Letter Verified if you have confirmed
the Nomination Letter is attached and accurate to the PMD Record. - Click Save.

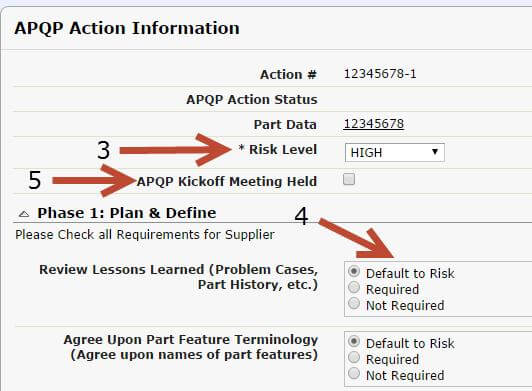
APQP Action Requirements Defined
Once the APQP Action record is created with a PMD Master selected, and the Nomination Letter has been verified, the APQP Action Requirements should be defined. This includes selecting the initial Risk Level of the part.
- Click on Define Requirements:

- Click Edit.

- Select the Risk Level for this part.
- All Tasks for each Phase are listed in the Phase sections on the screen. The AQE is also able to define the requirements of each subtask separately:
- Default to Risk – the requirement to the supplier to complete this subtask is based on the Risk Level
- Required – regardless of Risk Level, this subtask will be required to be completed by the Supplier
- Not Required – regardless of Risk Level, this subtask will NOT be required to be completed by the Supplier
Note: The Risk Level can be changed at any time throughout the lifecycle of the APQP Action. Any change to the Risk Level after the Gate 1 Review, however, will require that all Subtasks are re-confirmed and Gate Reviews are Re-Reviewed.
- Once the APQP Kickoff Meeting has been held, click on the checkbox.
Note: Once you click on Save, AND the APQP Kickoff Meeting is checked, the Supplier Information will be locked, and the supplier will be notified of the APQP Action.

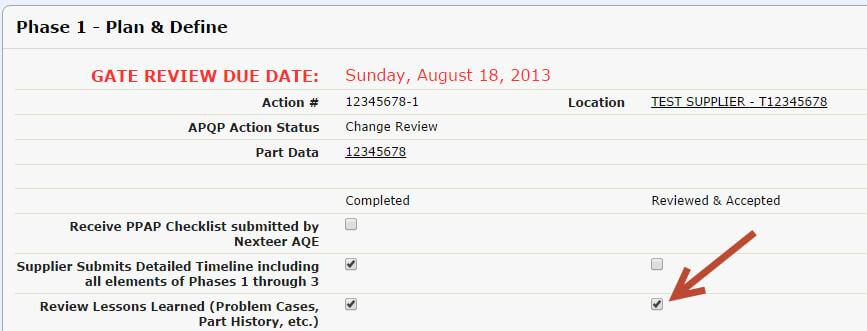
Subtask Confirmation
The Reviewed & Accepted field will display once the subtask is marked as Completed. This Reviewed & Accepted field can only be completed by Nexteer.
To confirm the completed subtask(s):
- Click on Phase {#} Tasks link to
 enter the Phase subtasks that
need to be confirmed. - A new view will show providing a list of all required and completed subtasks for the
Phase selected.
Note: Only those subtasks that are marked as required per the selected Risk level or AQE Dispositions will show in this view, and the Reviewed & Accepted field will only show for those subtasks that have been marked as completed.
- Confirm appropriate information has been provided/completed for the subtask(s).
- Click Edit.
- Mark the checkbox next to any subtask that is confirmed as completed.
This field can only be completed by Nexteer. - Add any comments in the Nexteer Comments box.
- Click Save.
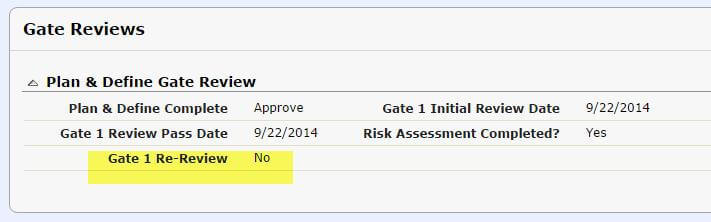
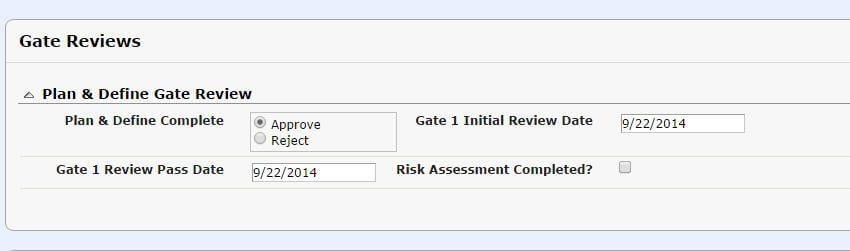
APQP Action Gate Reviews
As soon as all subtasks for the Phase are shown as Completed and have been Reviewed & Accepted, a Gate Review is able to be completed for each Phase.
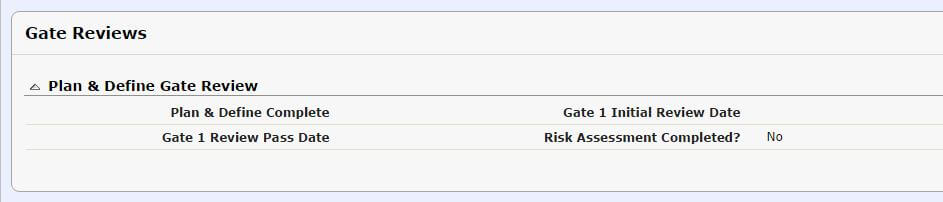
To complete the Gate Review in the system:
- Click Edit in the Main APQP Action view.
- Scroll down to the Gate Reviews section.
- Select your disposition for the Gate Review (Approve or Reject).
Note: The Initial Review Date is populated automatically whenever the Gate Review disposition (Approve or Reject) is entered. The Review Pass Date is populated automatically whenever the Gate Review disposition is marked as Approve.
- Mark the checkbox next to Risk Assessment Completed? to indicate that the Risk Level has been reviewed and adjusted if necessary (see Risk Assessment section below).
- Click Save.
RISK ASSESSMENT
As a part of your Gate Review, you will be asked to complete a Risk Assessment to determine if the current Risk Level is still accurate. If a change is needed to the Risk Level at any time:
- Click on Define Requirements:
- Click Edit.
- Make any necessary changes.
Note: Any change to the Risk Level or individual subtask may require some new subtasks to be completed by the supplier. A change may also require that subtasks are re-confirmed by the Nexteer AQE. See Subtask Completion and Subtask Confirmation sections.
GATE RE-REVIEWS
Changes to the Risk Level and/or requirements on the subtasks will require that any completed Gate Reviews are Re-Reviewed. To Re-Review your completed Gate Review:
- Click Edit in the Main APQP Action view.
- Scroll down to the Gate Reviews section.
- Mark the checkbox next to Gate {#} Re-Review field

Note: Until the Gate Review(s) is/are marked as Re-Reviewed, the record status will remain as “Change Review”.